Background
super[1]_native_extensions, a Flutter plugin powering super_clipboard, super_drag_and_drop and super_context_menu (yes, they're really cool, go check them out, I'll wait), is a spinoff of NativeShell. It takes certain functionality from it, turns it all the way up to 11 and packages it as a regular Flutter plugin that can work on any platform that Flutter supports.
Unsurprisingly, there's a quite a bit of native code in super_native_extensions. Around 23k lines of it, which is roughly the size of Flutter Windows embedder. It would probably be significantly more if I couldn't reuse decent chunk of it across platforms.
Almost all of native code is written in Rust. There is something refreshing about having one sane language and one sane build-system to rely across all platforms compared to the insanity of having to deal with 3 different languages, build systems and sets of tools.
super_native_extensions is certainly not the first Flutter plugin that uses Rust, but to the best of my knowledge it is the first one that doesn't rely on shipping prebuilt binaries.
What's wrong with prebuilt binaries?
Long story short, I don't like them. Like really, really don't like them. I'd never be comfortable shipping a project with binaries that I didn't built myself (Flutter engine being notable exception here). It also makes it awkward to integrate with the main package (or needs a separate package), needs CI steps to pre-build them and all in all, just feels wrong. Icky.
I'm not saying that the binary you have downloaded from pub and are happily shipping now is going to mine bitcoin on your users machines, but I'm also not saying that it won't. The fact is - binaries are simply lot more difficult to audit.
Alright. So what's the catch here?
Well, there is one. It's small, but it's there: The developer using your plugin (not the end user of course) needs to have Rust installed. Through rustup.
Rustup installation is trivial and pretty much foolproof. One command and you're done (or a single installer file on Windows).
That is it. All other steps, such as installing required targets for cross compilation, or setting up the NDK for Android builds are done automatically by the plugin and will not bother your users unless something goes wrong.
Goes wrong? Yes. Like if the developer installs Rust through homebrew or other package manager instead of using official rustup. These result in half broken installations that can't install custom targets (no cross compile) and are generally useless for anything else other than building other homebrew packages. Friends don't let friends install Rust through homebrew. Go rustup or go home. Alright. Rant over.
UPDATE: New cargokit version will ignore homebrew Rust installation and only use the one from rustup. This should make the build process even more robust.
Okay, can we get to it already? How do we build the plugin?
Easy. With Cargokit - the magic sauce. Or more of a magic glue I suppose. It integrates cargo build with whichever tool Flutter uses to build plugin on each platform (Gradle, CocoaPods and CMake)
It is built to be integrated with Flutter plugins and project, and other than driving the build itself, it can also transparently install required targets for cross compilation and set up the NDK for Android builds.
It is also severely undocumented and I keep forgetting how to set it up, that's why I'm writing this article.
Step by step instructions for building a Flutter FFI plugin with Rust code and Cargokit
1. Create a new Flutter FFI plugin
flutter create --template=plugin_ffi hello_rust_ffi_plugin --platforms android,ios,macos,windows,linuxThis creates the plugin of rather unimaginative name generating code for all supported platforms.
2. Add Cargokit to the plugin
Initially, my plan was to add Cargokit as a git module to the plugin, but it turns out that dart pub doesn't like that. For git dependencies it doesn't fetch submodules.
Fortunately, there is another way. We can achieve a very similar effect using git subtrees.
Let's first enable git for our plugin and commit all the files so that we have a clean state to work with.
cd hello_rust_ffi_plugin
git init
git add --all
git commit -m "initial commit"
Now we can add Cargokit as a subtree:
git subtree add --prefix cargokit https://github.com/irondash/cargokit.git main --squashThis will add the contents of Cargokit repository to cargokit directory in our plugin in one squashed commit.
If, at any point you wish to update cargo kit, you can do so by running
git subtree pull --prefix cargokit https://github.com/irondash/cargokit.git main --squashUnlike git modules, subtrees actually live in your repository and thus work with pub without any issues.
2. Add Rust code
If you look at src/hello_rust_ffi_plugin.c, you'll see something like this:
// A very short-lived native function.
//
// For very short-lived functions, it is fine to call them on the main isolate.
// They will block the Dart execution while running the native function, so
// only do this for native functions which are guaranteed to be short-lived.
FFI_PLUGIN_EXPORT intptr_t sum(intptr_t a, intptr_t b) { return a + b; }

// A longer-lived native function, which occupies the thread calling it.
//
// Do not call these kind of native functions in the main isolate. They will
// block Dart execution. This will cause dropped frames in Flutter applications.
// Instead, call these native functions on a separate isolate.
FFI_PLUGIN_EXPORT intptr_t sum_long_running(intptr_t a, intptr_t b) {
  // Simulate work.
#if _WIN32
  Sleep(5000);
#else
  usleep(5000 * 1000);
#endif
  return a + b;
}
This is what we're going for, but in Rust. Let's generate a new Rust library in rust directory.
cargo new rust --lib --name hello_rust_ffi_pluginNow we slightly need to tweak the generated rust/Cargo.toml file to make it work with Cargokit.
[package]
name = "hello_rust_ffi_plugin"
version = "0.1.0"
edition = "2021"

## >>>>>>>>>>>>> ADDED CODE >>>>>>>>>>>>>
[lib]
crate-type = ["cdylib", "staticlib"]
## <<<<<<<<<<<< ADDED CODE <<<<<<<<<<<<
The added configuration will make sure that cargo produces both shared and static library. We need both - on Android, Linux and Windows shared library will be used, but on macOS and iOS, where we need to integrate with CocoaPods, we'll need to link the CocoaPods framework with static library.
Now replace the code inside rust/src/lib.rs with this:
use std::{time::Duration, usize};

#[no_mangle]
pub extern "C" fn sum(a: usize, b: usize) -> usize {
    a + b
}

#[no_mangle]
pub extern "C" fn sum_long_running(a: usize, b: usize) -> usize {
    std::thread::sleep(Duration::from_secs(5));
    a + b
}

#[cfg(test)]
mod tests {
    use super::*;

    #[test]
    fn it_works() {
        let result = sum(2, 2);
        assert_eq!(result, 4);
    }
}
You can also delete the src directory that contains C++ code, we'll not be needing it.
Now it's time to integrate Cargokit with build process for each platform.
3. Integrating with CocoaPods on macOS and iOS
Here we first modify the macos/hello_rust_ffi_plugin.podspec file:
#
# To learn more about a Podspec see http://guides.cocoapods.org/syntax/podspec.html.
# Run `pod lib lint hello_rust_ffi_plugin.podspec` to validate before publishing.
#
Pod::Spec.new do |s|
  s.name             = 'hello_rust_ffi_plugin'
  s.version          = '0.0.1'
  s.summary          = 'A new Flutter FFI plugin project.'
  s.description      = <<-DESC
A new Flutter FFI plugin project.
                       DESC
  s.homepage         = 'http://example.com'
  s.license          = { :file => '../LICENSE' }
  s.author           = { 'Your Company' => 'email@example.com' }

  # >>>>>> Everything after this line is new <<<<<<<

  s.source           = { :path => '.' }
  s.source_files     = 'Classes/**/*'

  s.script_phase = {
    :name => 'Build Rust library',
    # First argument is relative path to the `rust` folder, second is name of rust library
    :script => 'sh "$PODS_TARGET_SRCROOT/../cargokit/build_pod.sh" ../rust hello_rust_ffi_plugin',
    :execution_position => :before_compile,
    :input_files => ['${BUILT_PRODUCTS_DIR}/cargokit_phony'],
    # Let XCode know that the static library referenced in -force_load below is
    # created by this build step.
    :output_files => ["${BUILT_PRODUCTS_DIR}/libhello_rust_ffi_plugin.a"],
  }
  s.pod_target_xcconfig = {
    'DEFINES_MODULE' => 'YES',
    # Flutter.framework does not contain a i386 slice.
    'EXCLUDED_ARCHS[sdk=iphonesimulator*]' => 'i386',
    'OTHER_LDFLAGS' => '-force_load ${BUILT_PRODUCTS_DIR}/libhello_rust_ffi_plugin.a',
  }
end
There is one more step that we need to do. Edit macos/Classes/hello_rust_ffi_plugin.c and remove all code from it:
// This is an empty file to force CocoaPods to create a framework.This should be it. You can do the same for ios directory, but given that they share the same podspec, you can just use do a symlink from macos to ios.
rm -R ios
ln -s macos ios
4. Integrating with CMake on Windows and Linux
This should be fairly straightforward. Open windows/CMakeLists.txt and linux/CMakeLists.txt and modify it accordingly:
# The Flutter tooling requires that developers have CMake 3.10 or later
# installed. You should not increase this version, as doing so will cause
# the plugin to fail to compile for some customers of the plugin.
cmake_minimum_required(VERSION 3.10)

# Project-level configuration.
set(PROJECT_NAME "hello_rust_ffi_plugin")
project(${PROJECT_NAME} LANGUAGES CXX)

# >>>>>>>>>>>>>>>>>>>>>>>>>>>>>>>>>>>>>>>>>>>>>>>>>>>>>>>
# Replace add_subdirectory that references old C++ code with Cargokit:
include("../cargokit/cmake/cargokit.cmake")
apply_cargokit(${PROJECT_NAME} ../rust hello_rust_ffi_plugin "")
# <<<<<<<<<<<<<<<<<<<<<<<<<<<<<<<<<<<<<<<<<<<<<<<<<<<<<<

# List of absolute paths to libraries that should be bundled with the plugin.
# This list could contain prebuilt libraries, or libraries created by an
# external build triggered from this build file.
set(hello_rust_ffi_plugin_bundled_libraries
  # Defined in ../src/CMakeLists.txt.
  # This can be changed to accommodate different builds.

  # >>>>>>>>>>>>>>>>>>>>>>>>>>>>>>>>>>>>>>>>>>>>>>>>>>>>
  # Replace original target file with the one produced by Cargokit:
  "${${PROJECT_NAME}_cargokit_lib}"
  # <<<<<<<<<<<<<<<<<<<<<<<<<<<<<<<<<<<<<<<<<<<<<<<<<<<<<
  PARENT_SCOPE
)
The content of Windows and Linux CMakeLists.txt files should be identical, except for the minimum version required.
5. Integrating with Gradle on Android
You will need to remove the ndkVersion and entire externalNativeBuild section from android/build.gradle file. Cargokit will take care of setting up the NDK and running the build. The final android/build.gradle file should looks like this (newly added cargokit integration code at the bottom):
// The Android Gradle Plugin builds the native code with the Android NDK.

group 'com.example.hello_ffi_plugin'
version '1.0'

buildscript {
    repositories {
        google()
        mavenCentral()
    }

    dependencies {
        // The Android Gradle Plugin knows how to build native code with the NDK.
        classpath 'com.android.tools.build:gradle:7.3.0'
    }
}

rootProject.allprojects {
    repositories {
        google()
        mavenCentral()
    }
}

apply plugin: 'com.android.library'

android {
    if (project.android.hasProperty("namespace")) {
        namespace 'com.example.hello_ffi_plugin'
    }

    // Bumping the plugin compileSdkVersion requires all clients of this plugin
    // to bump the version in their app.
    compileSdkVersion 33

    compileOptions {
        sourceCompatibility JavaVersion.VERSION_1_8
        targetCompatibility JavaVersion.VERSION_1_8
    }

    defaultConfig {
        minSdkVersion 19
    }
}

// <<<<<<<<<<<<<<<<<<<<<<<<<<<<<<<<<<<<<<<<<<<<<<<<

apply from: "../cargokit/gradle/plugin.gradle"

cargokit {
    manifestDir = "../rust"
    libname = "hello_rust_ffi_plugin"
}

// >>>>>>>>>>>>>>>>>>>>>>>>>>>>>>>>>>>>>>>>>>>>>>>>
6. Testing the plugin
Now that everything is set up, we can finally test the plugin. There is an example application already, that should just work unless we messed something up.
cd example
flutter run -d macos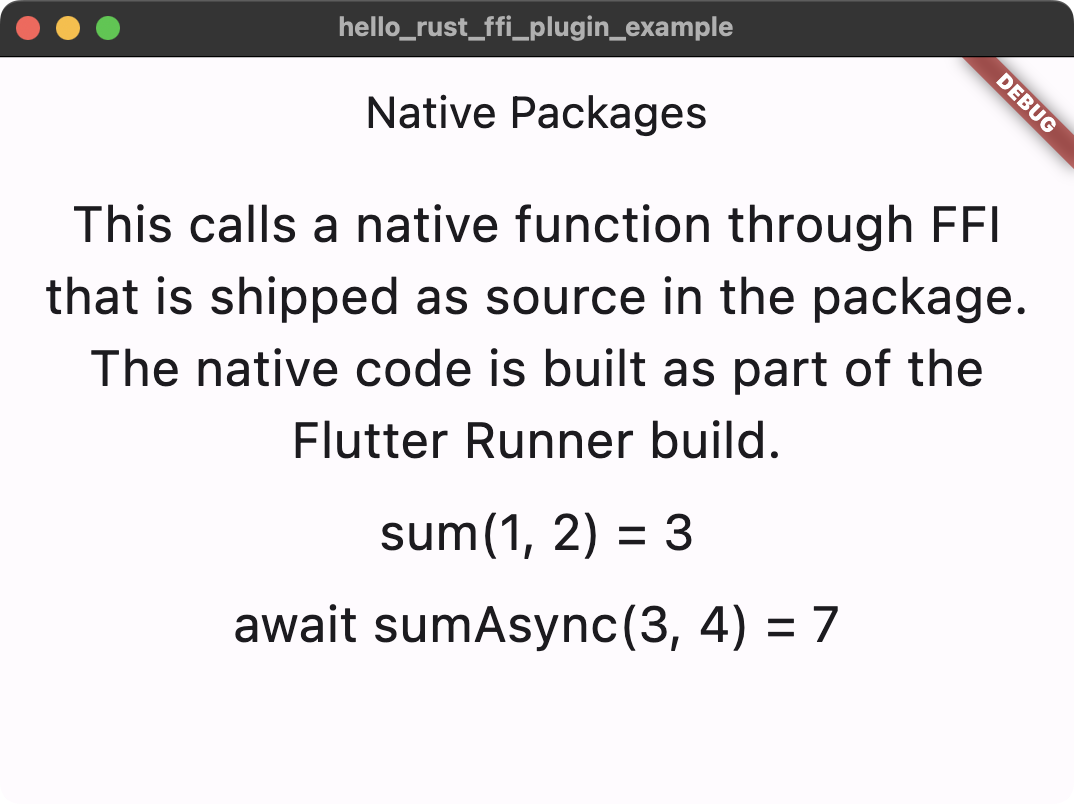
Example repository for the plugin with all changes is available here.
7. What's next?
While this is very handy for building FFI plugins, it doesn't cover all use cases. Cargokit can be used for non-FFI plugins as well (see super_native_extensions for example), but also to integrate Rust code with Flutter application (not a plugin). There is not a whole lot of documentation for this yet, but you can see it in action in the texture example of irondash. What's irondash your might ask? Good question. Maybe I'll get to that another time.